Weather | Buy&Sell | Forums |  |
Weather | Buy & Sell | Gallery | Forums | |

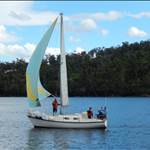
Some one was using one of these down at the marina today very stable

Made my wiring ready for the second fridge and did some frame supports work for the fridge also. Mounted my deck wash pump . Ill Tee off the engine sea cock at this stage see how it works out When I'm on the hard next Ill be fitting two 1 1/2 sea cock one for the engine ( plus head inlet and deck wash)and the other for the head out let.
Removed the thrust plate off the water pump to inspect what the impeller looked like . When I did I found a piece of crud sitting in the outlet pipe of the pump which would have reduced my flow to the engine. So after ecery thing was refitted I ran her in forward gear for 1/2 and hour seen a lot better than yesterday.

![]()
![]()


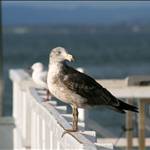
Red sky in the morning, sailors warning.
Red sky at night, sailors delight.
I thought it was a sunset. I am not an early riser.![]()

Yes to all, it was taken just after sunrise [no storm in sight though] on the Camden Haven River, NSW.
Had the first fitting of my new horizontal wind vane today, only a few adjustments [already done] and the steering ropes to be fitted.
Have to remove the stern ladder also.


The original stanchions are alloy was going to change them to stainless steel thought Id tidy them up and use them for a couple of years used Kill rust epoxy white seems to have stuck OK .
So those boat dollars save can go to some thing else ![]()

Mounted my safety rails roughly this morning before work
One less thing hanging around home
 [/
[/
Staunchtions I meant bubble corrected me biit sleepy this morning ![]()
Starting to look like a yacht HG02. ![]()
Sea trails will have to occur after I slip SEAKA.
Moved the rudder yesterday and felt all the barnacles crunching so I suspect the prop is foul too.
Only dived on her a couple of weeks ago and cleaned the sh#t off ![]()


Major expenses over for a while now . Next is finish off the port side completely and then start on finishing the star board side that should keep me busy for a coupe of months also I need to finish off the deck painting on fine days ,while I save for Anchor windlass.
After that is get the masts home and start on a repaint
HG , That is going to be the best H28 in the history of the universe ......... you are to be congratulated , keep up the amazing work !!!!!!
Spent the whole day trying to fix thus lesk under the sink which I thought would be a five minute job putting thread tape on this elbow joint. Two trips to town later and then advised to just use sikaflex now waiting till tomorrow to see if that worked.

[
img]
D


There should be a small black rubber seal, that gets tightened(before the thread as LC said) on as you screw the joint together, that should of been enough.


Yeah..don't put tape on the threads norto. When you go to get the seal, ask for trap washers. It's hard to tell if you will need the square ones or the double taper variety from the photos. Take the elbow with you. I reckon they will be square.
That plug and waste assembly will be fine with kitchen and bathroom silicon, but get a rubber ring if you want to. Don't worry about sealing inside the bowl, just seal between the bottom flange and the underneath of the sink.
Silicon will dry in a few hours. Fill up your sink to the top and let the water run out in one big rush to test it.
If you have trouble, trash that mess and buy and new plug n waste and s and p combo trap etc. That way you'll get all new seals etc.

Removed the port side cedar roof enough to epoxy a ply wood plate in there for the grab handles and closed ever thing up and screwed down my two remaining grab handles and wired in the other teak lamp..
I have made the grab handle fit close to where the port lights are open in doing so it also holds the port light open so they cant close theres not quiet enough friction on the port light to keep them selves open on there own . The two smaller port they stay open on there own but the larger ones just a little bit to much weight .
Had several cold drinks out of the fridge and put in some zooper doopers into one fridge and cranked it up to freeze them . Should be good tomorrow in the heat of the afternoon .![]()
Tomorrow Ill wire in the port side lights to the switch panel I have a feeling the switch panel might end up like the engine gages some where else than where they were or are.
I may make another Huon panel for the opposite side from the stereo and put all my house wiring to it and fix switch panel on to it. Ill have a separate switch panel for my motor and sailing system at the moment my battery box where every thing is terminate to is started to look like a ferrets toilet ![]()
Ive been thinking about my front speakers ( near the chain plates) and may use some ply and have another go at Huon pine veneering and do a matching set up similar to the one Ive done already below.

I should be able to do a much better job of it this time learn't a few things not to do last time.
The bottom cedar strip on the port lights Ill remove and trim the next short cedar planks so the bottom cedar strip can close up the gaps under the port lights
.
Ill probably remake the short plank on the right. My main concern is getting it up there I can always redo a few things later that are N.Q.R.
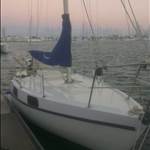
Set up the new solent stay. It's stored on an eye next to the forward shroud. Seems to work but I'll need to make it a bit easier to set up with some easy clips rather than using tiny shackles with unsecured pins. I suppose if I'm heading out on a long trip I can set it up beforehand and furl the genoa when tacking / gybing.
I wasn't sure where to attach the tack and this seemed to work. Is that okay?
I ran the sheet on the stormsail back to a place where I thought it might work based on the angle of the sail.
I'd like to get a smallish jib to hank on also.
Any thoughts or ideas for those with experience with these things?


PS: the second last pic is how the sheet sits at rest and the last one is me leaning on it estimating how it might be in a blow.
That small shackle in the second picture is all that's holding everything together, either it's gross underkill or the other two shackles are gross overkill. Also where the stay is positioned it isn't a Solent stay anymore, rather now the whole rig is called a Slutter rig. A Solent stay would be positioned further back from the fore stay.
Thanks for the links, Cisco.
I have looked at every Adams 31 online for the past few years and have seen none set up as a cutter, so your mate's is very unusual and not to design - Joe Adams designed it as a sloop (with an optional inner stay, which is rare). I elected to have the stay further forward to avoid running backstays and so I could hank on a jib rather than have to change wrestle the genoa down.
Re the sheeting, the genoa tracks extend to just beyond the mast so I can certainly move the cars a lot further forward. I suppose I shall have to take her out in a breeze and see what works.
Re the clew, this particular storm jib is undersized as far as the specs go (5.2m2 rather than 7.25m2) so perhaps that's a factor in where the clew sits. For now I've chosen to attach the stay to the existing cleat wanting to minimise time and costs at the rigger's and because at the time I was installing a windlass and wasn't sure how they'd work completing for deck space at the bow. I suppose it isn't ideal and I could 'fairly easily' install a well-reinforced eyepad at the anchor locker bulkhead.
Thanks for the input. :)