Shaggy
Thanks for keeping us dinosaurs informed on what is happening in 2020.
Will you do the seal replacement yourself or get someone to do it?
Warranty job?
Gary
Select to expand quotegarymalmgren said..
Shaggy
Thanks for keeping us dinosaurs informed on what is happening in 2020.
Will you do the seal replacement yourself or get someone to do it?
Warranty job?
Gary
G'day Gary,
Yep, we'll have a go ourselves first.
If it proves to be any seals, it might be the verniers, phone calls to the French and a bit of running around, but theoretically all do-able. If it's a more nuanced issue I might have to flick it over to a professionals.
Yeah, out of warranty period now, but even if it was, I keep thinking that hitting that whale is related, and I couldn't in all good conscience warranty claim knowing that .
Cheers!
Shaggy, I am in France and coming to OZ in about 5 weeks. If I can help PM me. Can speak French if you need as well.
Select to expand quotetarquin1 said..
Shaggy, I am in France and coming to OZ in about 5 weeks. If I can help PM me. Can speak French if you need as well.
That's awesome Tarquin, thank you very much!
I hope to have it out and on the bench this weekend, and work out any parts or spare needed, so early next week I may take up your very kind offer.![]() ,
,
I love the sailing community!
There is these ice cream vans at the bottom of the Eiffel tower that makes the world most wickedly good gelato, I don't suppose you do food orders as well? Or some fresh bread from one of the little French patisseries....mmmm.........![]()
Thanks mate, I appreciate it!
SB
Hi Shaggy
Looks like fun
In the photo you posted what is the function of the long threaded section below the ram pivot point
I am guessing the ram mounting bolts extend across the keel box to support the ram equally on both sides
Regards Don
Select to expand quoteshaggybaxter said..
Starboard side done, portside to go. Looks almost naked without a colour. Hmmm..still out to lunch on it atm....

New boat new sailing life I say
Select to expand quotekramboat said..
Had 2 russian dudes help me install my autohelm yeww!
ps first time poster.

Welcome to the forum Kramboat!
Looks very slick mate, now all you have to do is work up the courage to try the autotack feature! The first time I did it I was under kite in thankfully light breezes, (accidental, I pressed both buttons at once by mistake) and suffice to say it ended in a bit of a mess!
The only saving grace was there was no-one else around to see my looking like a complete numpty ![]()
So what boat?
Cheers,
SB
Edit: did you go with a rudder angle sensor as well? Something I didn't do, and in hindsight it would have been really good to complement the setup.
Select to expand quoteDonk107 said..
Hi Shaggy
Looks like fun
In the photo you posted what is the function of the long threaded section below the ram pivot point
I am guessing the ram mounting bolts extend across the keel box to support the ram equally on both sides
Regards Don
HIya Don,
That's a great question! It took us a while to work this out.
Yes, there are four bukka rods go all the way through the keel box and pick up either side on some pretty hefty s/steel plates.
From what I can tell the s/steel plates are actually the pivot bracket that fix the ram to the keelbox, the bukka rods are the 'structure' it hangs off.
So, the instructions for removal are:
-- disconnect the two hydraulic hoses from the ram.
-- remove the s/steel backing plates on the outside of the keelbox, ( the ram is now disconnected from the boat)
-- the keel is down. There are two sight glasses, one either side of the keelbox. Where the ram connects to the keel will be lined up with these sight glasses. Remove the sight glasses (siliconed on), undo and remove the bolt and nut fixing the keel to the ram through the sight glasses. (the ram is now disconnected from the keel)
-- Slide the ram backwards. Voilah!
It all sounds too easy, What could possibly go wrong??? ![]()
![]()
![]()
Select to expand quoteshaggybaxter said..kramboat said..
Had 2 russian dudes help me install my autohelm yeww!
ps first time poster.
Welcome to the forum Kramboat!
Looks very slick mate, now all you have to do is work up the courage to try the autotack feature! The first time I did it I was under kite in thankfully light breezes, (accidental, I pressed both buttons at once by mistake) and suffice to say it ended in a bit of a mess!
The only saving grace was there was no-one else around to see my looking like a complete numpty ![]()
So what boat?
Cheers,
SB
Edit: did you go with a rudder angle sensor as well? Something I didn't do, and in hindsight it would have been really good to complement the setup.
Thanks Shaggy it's good to be here. I have an Adams 31 CC. I haven't had a chance to play around with it all too much. I know for sure I have not set it perfectly (set the hard over time too low thinking that lower values = quicker response, but apparently it's the opposite). I probably should've read the manual before testing it on the water. Either way it's definitely working after a test on the weekend. Will hopefully get a few more solo hours up soon.
Also, I do not have the rudder angle sensor but it seems pretty trivial to add to the setup. Will see how I go with this setup first.
Select to expand quoteshaggybaxter said..Donk107 said..
Hi Shaggy
Looks like fun
In the photo you posted what is the function of the long threaded section below the ram pivot point
I am guessing the ram mounting bolts extend across the keel box to support the ram equally on both sides
Regards Don
HIya Don,
That's a great question! It took us a while to work this out.
Yes, there are four bukka rods go all the way through the keel box and pick up either side on some pretty hefty s/steel plates.
From what I can tell the s/steel plates are actually the pivot bracket that fix the ram to the keelbox, the bukka rods are the 'structure' it hangs off.
So, the instructions for removal are:
-- disconnect the two hydraulic hoses from the ram.
-- remove the s/steel backing plates on the outside of the keelbox, ( the ram is now disconnected from the boat)
-- the keel is down. There are two sight glasses, one either side of the keelbox. Where the ram connects to the keel will be lined up with these sight glasses. Remove the sight glasses (siliconed on), undo and remove the bolt and nut fixing the keel to the ram through the sight glasses. (the ram is now disconnected from the keel)
-- Slide the ram backwards. Voilah!
It all sounds too easy, What could possibly go wrong??? ![]()
![]()
![]()
Hi Shaggy
It sounds pretty straight forward as long as everything comes apart ok and the parts you need are available for the ram
Regards Don
This morning was a trip up to Rvergate and success! we managed to get the ram out today.
The first stage was to drop the pin out that holds the ram to the keel. This necessitated removal of a small 5mm allen key bolt with a big flat washer either side of the keel head, and that gave you access to the pin itself. Look for the circlip on one side and then simply drift punch the pin out in the opposite direction. It came out straight away , all very simple and quick.
The second part was unbolting the ram from the keelbox, which was 4 nuts either side and drop off the big s/s plates. Preceded by a fair bit of work with knife blades cutting away the generous amount of silicon binding the plates on. One neat trick I really liked, at the top and bottom of both plates a small 5mm hole had been drilled and a nut welded on. By putting any 5mm bolt in and doing it up you pulled the plate off the keelbox to break the silicon bead. It certainly helped, but there was a LOT of silicon, hence the knives.
With that out of the way, all we had left was to 'slide' the ram out. And that turned out to be a mongrel. Some lube gunk on the keel/ram mating had picked up some dirt and rubbish, enough to stop the ram head from sliding out of the keel. You know one of those jobs when you don't have the purchase to pull against? The ram is cylindrical and felt like you were wrestling a muddy pig. It would move about 1" and then get caught on something in the keel and refuse to budge. Grrr...
After an hour or so of sweating and cursing, still no success. So we applied an old mechanics trick, soaked everything we could reach in Innox, downed tools and walked away from it for 10 mins.
Came back and sure enough, a few more struggles and curses then out she popped, no problems at all.![]()
So, tomorrow will be play "find the leak". We'll use compressed air to point us to the right spot, then get it up on the bench and start stripping it. It's heavier than I expected, it's a struggle to carry it by yourself.
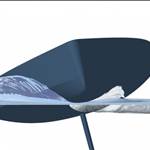
I'll try and post some pics, today was too much hydraulic oil and sweat for pics. I did manage to get a few pics on the trip down, ending with this one of a cruise ship playing the tide passing us under the Gateway bridge. not much wriggle room there!

IOR hull form showing why they go to windward so sweetly. Davidson 34.
Looking comfortable with a nice lead to a hard charging T7, a Sydney 38 reaching in the 8-12 knots breeze.

Kinda hard to look all romantic with big rust streaks down the flanks, she looked a bit tired and ordinary. But little to no wake, that was good of them.
One neat trick I really liked, at the top and bottom of both plates a small 5mm hole had been drilled and a nut welded on. By putting any 5mm bolt in and doing it up you pulled the plate off the keelbox to break the silicon bead. It certainly helped, but there was a LOT of silicon, hence the knives.
So good to see someone engineering ahead of the game.
gary
Great job shaggy and very well described.
Now that Fusion has revealed that one of her secrets to you, the next time will be a lot easier.
I am sure there will be a next time if you continue trying to chop whales in half with that 9 ft drop blade. ![]()
Select to expand quotecisco said..
Great job shaggy and very well described.
Now that Fusion has revealed that one of her secrets to you, the next time will be a lot easier.
I am sure there will be a next time if you continue trying to chop whales in half with that 9 ft drop blade. ![]()
Cisco,
Utterly the whales fault, we were on starboard.
One side benefit to pulling things off is getting to clean everything properly. Every nut and bolt and plate is with the ram and tomorrow will be either in the parts washer or sandblaster. Once the ram is diagnosed and fixed/parts ordered, I'll pull the oil reservoir and the hoses out this and flush everything.
I have to say the service at Rivergate is impressive. Jason, the marina manager (boat owner) was awesome. Gave me multiple fobs, made sure we had a 7m LAT berth, made sure we had close parking, offered to drive us to Coles/pub if we needed provisions during our stay and stressed repeatedly that ANY assistance or requirements we were to contact them anytime.
I was blown away at the sheer enthusiasm, what a lovely start to our visit.
Nice work. What's Innox?
Hope it's something simple. Check the ram itself for any slight pitting or damage that would damage the seal as it sides in and out.
Select to expand quotetarquin1 said..
Nice work. What's Innox?
Hope it's something simple. Check the ram itself for any slight pitting or damage that would damage the seal as it sides in and out.
Maybe Shaggy means Inox ? (ps, nice update and pics)
Sheep fat
"Lanolin is a waxy substance derived from sheep's wool, and is sometimes referred to as wool wax, wool grease and, less frequently, wool fat."
www.inoxmx.com/about/
Interesting claim
"Hulls and Anti-FoulingSpray INOX-MX3 on oxidized fibreglass hulls and buff polish off with a rotary polisher. Cleans off the oxidization and protects against further oxidization, leaves the hull looking like new.Melt LANOX-MX4 grease and paint on all metal fittings below the water line for anti-fouling and corrosion protection, on metal hulls, propellors, rudders, water in/outlets, bow thrusters, etc. Stops marine growth for to 2 years.Stops electrolysis between dissimilar metals.The Great Lakes, USA, LANOX-MX4 grease painted on hulls below the waterline will stop the growth of Zebra clams on the hull."
www.inoxmx.com/applications-and-uses/marine/
 I use lanolin oil on the coachouse and doghouse for years including the perspex,do it every 4 months or so on 36 year old gelcoat.
Gives it a low sheen look
Sorry gents, that was my fat fingers. Craig picked it, I meant to write Inox. Brilliant for any cleaning or degreasing , we use for cleaning through to unseizing bearings that you would swear were toast.
My go-to squirty squirty.![]()

And we found the problem, the main shaft seal was destroyed, looked like foreign objects from installation.


This is one of the s/s plates, you can see how this acts as the ram pivot. Now the cleaning starts!
So shaggy,, was it just the o-ring on the cylinder cap/ ram shaft seal housing ( the one you have pictured) or the seal that goes inside the cap housing that seals the ram shaft,( Not pictured) ??
G'day Jolene,
Yes, which I was not expecting! it was the O ring on the hydraulic cylinder end cap. ??? The inner seals, ie: the ones surrounding the ram shaft itself were all good, which is where I was expecting the problem to be. Especially if it was from hitting something, but this seal simply seals the end cap onto the cylinder.
This makes me think it was a problem when the ram was first assembled, as this o-ring can't suffer damage from keel shock from a collision or running aground. The other tell is it took about 45 mins with a drift punch to get the end cap off, and the threads were grindy all the way...oh dear.
After we got it off we could see It looked like something foreign had been in the threads when they first assembled it, and in the process of screwing the end cap on, whatever was caught up has damaged the threads and possibly the o-ring. This pic is when we first cracked it open,the black bits are bits of o-ring and the damage to the threads is just discernible, they were razor sharp, as all three of us soon found out!.

It took about 6 hours of work with thread files and small steel buff to repair both the male and female threads. Now the end cap is at a state where you can hand screw it on, except for one tight spot right at the end of the thread. I can't find any more damage and a oil filter wrench is enough to get past the tight spot, so its now good enough to assemble.
Tomorrow is take it down to the hydraulic gurus and see if I am lucky enough to get a seal kit without too much hassle. I'll do all the seals just in case, it's not like I want to do this again for a while!

I showed my wife the pics, and bless her, her only comment was "That's one of our good towels!"
Oops.... ![]()
![]()
It does seem to lack a nice polished radius into the o-ring compression area.
It might be worth measuring how much o-ring compression you have.
Select to expand quoteJolene said..
It does seem to lack a nice polished radius into the o-ring compression area.
It might be worth measuring how much o-ring compression you have.
That's a good point Jolene, didn't think of that, thanks!

www.catch.com.au/product/rainbow-skies-beach-towel-microfiber-travel-towel-compact-3467315/?sid=towels%20beach&sp=16&st=32&srtrev=sj-q5d3w2n2n0ozkkv8hra8k2.click
Hey Shaggy, check the link, keep you in the good books for a few bucks ![]()
Select to expand quoteCraig66 said..
www.catch.com.au/product/rainbow-skies-beach-towel-microfiber-travel-towel-compact-3467315/?sid=towels%20beach&sp=16&st=32&srtrev=sj-q5d3w2n2n0ozkkv8hra8k2.click
Hey Shaggy, check the link, keep you in the good books for a few bucks ![]()
Shaggy, being in the stainless steel game, that damage to the thread looks like galling which would cause the damage to the thread and make it nearly impossible to undo. Just make sure when you reassemble you use Nickel Chromate or some form of never seize, even Tefgel would be O K. No stainless steel nut should ever be put on a stainless bolt without some form of anti seize if you want to be able to undo it in the future. Google Stainless Steel Galling.
The internal thread has tool chatter. Its common in stainless because of the way it sings when you machine it. Tool geometry and rigidity along with speed, feed and depth of cut plays a big part in avoiding chatter. Often it occurs more often whilst cutting an internal thread simply because the machinist is being too careful. The tool chatter leaves tiny little barbs on the thread and these really help to start galling.
For applications where you constantly are having to assemble and disassemble a thread or bolt, often where permissible you can help by using two different grades of stainless,, eg 304 nut and a 316 bolt