Yesterday I had a bit of touching up to do on the bottom at the tail. But it's not worth doing small amounts of spray painting.
So I tried an experiment, so I could spray underneath I bodged up a fin box stand extension.

This worked surprisingly well, I haven't done much upside down spraying, the timber was very loose in the box so there was no problem of it getting stuck. But it held the board very stable, (the front stand was unchanged). So that was the painting finished.
Today I made the pads, started off making paper templates.

Pushed holes through to the inserts and transferred to the pad material and cut out, this stuff is for jet ski decks.

I may add a second layer under the heels, this should give a bit more cushioning under the heels and take some pressure off the instep.
I then traced around these on the board, and masked up for the sugar deck.

I mixed 50gm of the clear ultra violet resistant surf flex resin, and spread with a small foam roller, then sprinkled the sugar over until all wet spots disappeared.
Tomorrow I'll brush the excess sugar off and hose it off to dissolve the remaining sugar.
Then it's time to wet and dry the bottom, and maybe even polish it as well.
Select to expand quotedecrepit said
Mmm. I need some new pads for two of my boards. Where did this stuff come from and colour choice, not sure about that green on my AB+'s.
Great account of the projects.
Dave, I'm not sure but I suspect Pepe originally bought it.
This doesn't look like the exact same stuff, but if you google around you may find it.
www.atlanticjetsports.com/index.php?l=product_detail&p=1069
So more progress today, just about finished, I'll put the stickers on tomorrow.
4.9KG with pads. 5.4Kg with foot straps.

Had a lot of trouble with my experimental rear strap. It's just miles too stiff. I had to gring a lot of rubber away to get it big enough to get my foot in. If I'd formed it on a bigger mould, it would be OK for my foot, but it's not really adjustable. Doesn't matter where the screws go, there's just no give.
I think the theory is OK, but less layers, or softer material would be better.
So I'll be taking a couple of conventional straps with me in case it's no good.
Select to expand quoteBSN101 said..decrepit said
Mmm. I need some new pads for two of my boards. Where did this stuff come from and colour choice, not sure about that green on my AB+'s.
Great account of the projects.
Hi Dave, yep, bought it from a jet ski place in Qld.
Btw, nice going Decrep. Been following with interest.
Select to expand quotepepe47 said..
Btw, nice going Decrep. Been following with interest.
Doesn't look too bad from a distance, but it's way below your standards Paul, I was more obsessed with weight, so there's a distinct lag of bog in places, The paint's a bit skinny too, but see through paint is in these days, so I can get away with that.
Select to expand quotedecrepit said..pepe47 said..
Btw, nice going Decrep. Been following with interest.
Doesn't look too bad from a distance, but it's way below your standards Paul, I was more obsessed with weight, so there's a distinct lag of bog in places, The paint's a bit skinny too, but see through paint is in these days, so I can get away with that.
Great finish weight! Did you use a primer paint ? And was the white a 2 pack?
No primer, stuff seems to stick to epoxy just fine. I used some automotive spray putty in a can, ( because I'd run out of epinamel ,) but sanded most of that off.
Poly u 400, 2 pack urethane, is the white paint
Those Dakine front straps are almost 10% of the board weight. My back strap is about 50g the front straps are about 200g each.
A while ago I tried a couple of Keefs straps on the front of the old 48. They were also very light and felt great, but for some unknown reason stuffed my gybes up. Perhaps, it's time to have a play, and try and solve that one. I could get the weight down to 5.1 with my own front straps.
Select to expand quotesailquik said..
Great construction ideas Mike. ![]()
It a pity that no one makes a wide rear strap commericially anymore (that I can find anyhow). Luckily. I have a couple of spares left over from the early 90's. I am now tempted to follow your lead and make a better one though. ![]()
fantastic Mike you never seize to amaze me with your energy, great job on the straps keep it simple and practical
one of the reasons I made the custom straps was they are a lower profile than production straps, I kept kicking the straps jibing on the narrower boards
one advantage Daffy is you don't need to unscrew the strap to screw the fin in , these 3 straps are made of sail material and weigh 140gr for the 3 wet
Hi Mike,
im very impressed with your board. I was wondering if you had any concern about the edges of the mast base well tangling with your toes while gybing? Or will you be stepping much further aft?
Select to expand quoteSparky said..
Hi Mike,
im very impressed with your board. I was wondering if you had any concern about the edges of the mast base well tangling with your toes while gybing? Or will you be stepping much further aft?
Hi Sparky, I never step that far forward in a Gybe. My feet do some times get in the well, when I'm groveling in very light winds, it's not ideal, but has never been a problem.
So my board is finished, put the stickers on this arvo, and transfered it to the racks, leaving space on the trestles for Ratz's board.
So I've started shaping the foam I added. started off on the rocker line, and thought I had that right, so then went to the V onlt to find that the back of the board has none, in fact under the feet it's -ve. I'm not sure what's going on here, did my weights straighten the board out when I glued the foam in?????? or are my rocker and V numbers wrong?
I placed the old bottom on top of the new foam, and it seems to fit fairly well, so maybe the back of the board is flatter than I thought.
So my idea at the moment is to rout the rear section down 3mm using the rails as a guide, this will increase the rocker slightly and give me a slight V, so a bit of a compromise. It will also solve the problem of my hand saw fail.
The front section, I'll use the router directly on the shaped foam, recreating rocker and V 3mm down.
Fingers crossed this plan works!
Select to expand quotekeef said..
fantastic Mike you never seize to amaze me with your energy, great job on the straps keep it simple and practical
Thanks Keef.
My old boards are still using you rear strap, they have worked great.
Select to expand quotedecrepit said..
So my board is finished, put the stickers on this arvo, and transfered it to the racks, leaving space on the trestles for Ratz's board.
So I've started shaping the foam I added. started off on the rocker line, and thought I had that right, so then went to the V onlt to find that the back of the board has none, in fact under the feet it's -ve. I'm not sure what's going on here, did my weights straighten the board out when I glued the foam in?????? or are my rocker and V numbers wrong?
I placed the old bottom on top of the new foam, and it seems to fit fairly well, so maybe the back of the board is flatter than I thought.
So my idea at the moment is to rout the rear section down 3mm using the rails as a guide, this will increase the rocker slightly and give me a slight V, so a bit of a compromise. It will also solve the problem of my hand saw fail.
The front section, I'll use the router directly on the shaped foam, recreating rocker and V 3mm down.
Fingers crossed this plan works!
Sounds like a good plan. Not sure why it went wrong in the first place. It's the mysteries of board making and repairing. I get glitches like that lucky we can bog and glue foam, it's a frustrating waste of time when it happens.
That almost went really well!
But router slipped a bit and there's a few low spots, nothing a bit of bog can't fix.
I've now got the old bottom sitting on the new foam quite well, just needs a few more adjustments.
I'm feeling quite confident the old bottom will go back on without a problem. Good job too because it's 5mm, not 3mm as I thought, and I don't have any 5mm on hand. Buying a whole sheet would significantly add to the cost of this repair.
Wind tomorrow, so I may get a bit more done Wednesday, and perhaps even a pic or two.
Select to expand quotekeef said..sailquik said..
Great construction ideas Mike. ![]()
It a pity that no one makes a wide rear strap commericially anymore (that I can find anyhow). Luckily. I have a couple of spares left over from the early 90's. I am now tempted to follow your lead and make a better one though. ![]()
one advantage Daffy is you don't need to unscrew the strap to screw the fin in , these 3 straps are made of sail material and weigh 140gr for the 3 wet
Yes. I realy like the look of your straps Keef.![]()
I have been meaning to burn a hole in my wide rear strap for a long time, but it just seems easier to keep on unscrewing the rear straps (I am lazy and use the power driver ![]() ). The strap is not adjustable so it always goes back in the same adjustment. Maybe I will get out the soldering iron soon and make a hole.
). The strap is not adjustable so it always goes back in the same adjustment. Maybe I will get out the soldering iron soon and make a hole. ![]()
Thanks Dave,
Tried it today, but I got out too late, wind had gone horrible. too hard to judge performance, but it didn't seem to grovel as well in the lulls.
Back strap is a bit too tight, so I'll see if I can figure a way to loosen it.
Didn't get much done today, tried the heat gun on the rear strap with some success, I think that will be a lot better.
Also took a pic of where Ratz's board is at.

So the old bottom is just resting on the new foam. In the main it's a good fit. It's a bit high at the tail, some foam needs to be removed. And the front rails are sitting a tad high, because I haven't hollowed out the concaves enough. May get more done Friday arvo.
Select to expand quotecrustysailor said..
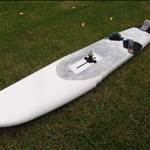
is there a final pic of the finished board anywhere?
scroll up to 2nd June, that's very close, all that's missing is the decals.
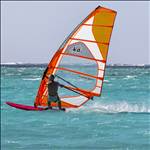
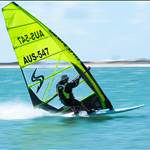
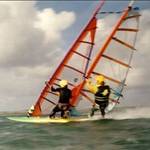
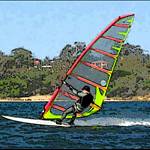
And there's some Pics Oaf took yesterday.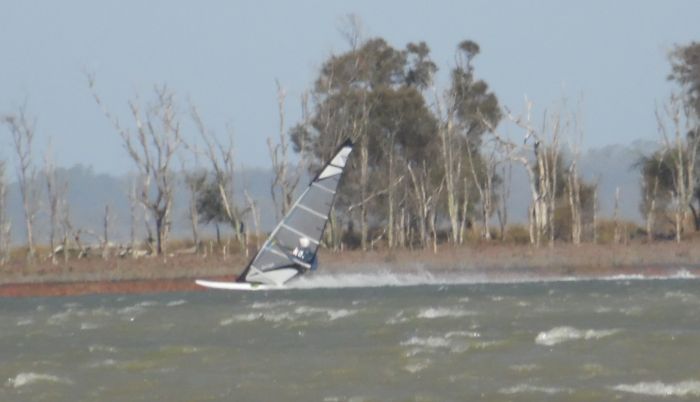 Goes fairly fast, and gybes well too
 More stuff about the day here.
www.gpsteamchallenge.com.au/sailor_session/show?date=2018-06-10&team=2
But If that's not enough I guess a final shot isn't a bad idea.
My wife was going to take a pic of me holding it today, but somehow it didn't happen.
Maybe tomorrow.
saw it in the flesh when mike sailed my local on the last front that come through.
have huge respect for someone who can build a board like that from scratch
even down to the footstraps.
Sun's out, so talked Dot into taking a few pics.

got dentist and Dr's appointments today so may not do much, could be back in the shed tomorrow.